Maysawa Circuit - Mt. Sa Pari (592+ MASL) and Mt. Binutasan (577+ MASL)
Sitio Maysawa, Brgy. Cuyambay, Tanay, Rizal
Mountain specs: Difficulty 3/9 | Minor climb | Trail class 1-3
Source: pinoymountaineer.com
FACTS ABOUT MAYSAWA CIRCUIT
Maysawa Circuit is one of the newly opened hiking destination in Rizal. Located in Brgy. Cuyambay, Tanay, Rizal, it houses two mountains - Mt. Sa Pari and Mt. Binutasan,and a waterfall-river system.
Mt. Sa Pari was called such as according to the locals, the mountain was owned by a priest. Mt. Binutasan, on the other hand, was called such due to a trail that seems to "binutas" or create a hole on the mountain, leading to other barangay in Rizal. Similar to Maynoba Circuit, Maysawa Circuit became famous due to sea of clouds and views of Sierra Madre.
-----------------------------------
 |
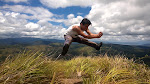
| The mountains are calling.. Breathtaking views from the trails of Maysawa Circuit. |
 |
| A common sight to hikers bound to Tanay. |
 |
| The barangay hall of Cuyambay with some of hikers bound for registration. |
 |
| Cuyambay Hane! Some of the attractions in Cuyambay presented in the barangay hall. |
 |
| First part of trail. Relatively flat and wide. |
The trail changes to a gradual assault. Because of the continuous rain, the trail is really muddy and slippery. Another challenge during that hike is the presence of limatik along the trail. Since the mountain has just recently opened, one can readily notice how less established the trail is. Moreover, there are a couple of forks that lead to different ways. Our guide told us that the entire circuit has more than three trails, but only a single trail reaches both peaks of Mt. Sa Pari and Mt. Binutasan.
 |
| The road less taken. Assaulting Mt Sa Pari |
 |
| Oh, say hello to that rock! |
 |
| Standing at the highest point of the entire circuit, with Mt .Binutasan at the background. |

One can readily observe that the summit character of Mt. Sa Pari is very much similar to its neighboring mountains such as Batolusong, Irid, Paliparan, etc, which can be seen from there. According to our guide, incidence of sea of clouds is higher in Maysawa rather than in the more famous Maynoba Circuit. We stayed in the summit for almost an hour.
Afterwards, we started our traverse to Mt. Binutasan. It was a gradual descent at first with a lot of confusing forks. Even though Mt. Sa Pari is higher in terms of altitude, most of the locals here call the summit of Mt. Binutasan as the "summit".
 |
| The muddy trail to Mt. Binutasan. |
 |
| The way to the summit of Mt. Binutasan. |
Different from Mt. Sa Pari, Mt. Binutasan is less rocky and full of vegetation, primarily of talahib and cogon grass. The ascent only starts from the summit marker, where one can reach the summit within an hour.
 |
| The view from one of the points of Mt. Binutasan, showing the range of Mt. Maynoba and Mt. Cayabu. |
The summit of Mt. Binutasan is marked by a red flag, It offers a 360° view of the rest of the Rizal mountains.
 |
| Mt. Sa Pari and Mt. Batolusong as seen from Mt. Binutasan. |
 |
| The rest of the Sierra Mountain southern mountains, with Mt. Irid and Mt. Tukduan Banoi seen from afar. |
 |
| Finally, conquered Maysawa Circuit! |
We started our descent down to the Maysawa Falls after thirty minutes of stay in the summit. The path to the falls starts with a grassy trail and according to the guide, this is the most limatik-infested part of the entire Maysawa Circuit. It was a continuous descent up until the fork marked by a coconut tree - the path going to the left will lead you to Maysawa River and Falls; the path on the right, to the circuit end, Unfortunately, during our descent down, rain started to pour. Our guide told us that going to the falls itself is not advisable. We just managed to go to the river.
 |
| The rushing clear water of Maysawa River. |
Just to note, before dipping to the river, ask the guide of the limatik presence because surprisingly, limatik are also present in the river, especially on those regions with rocks. My hiking buddy actually got one few seconds after dipping his body in the river.
We went back to the trail after fifteen minutes and in an hour and a half, we were back at the jumpof. After taking a bath and settling our payments, we headed back to Manila.
ITINERARY
|
Maysawa Circuit (Mt. Sa Pari – Mt. Binutasan)
|
|
|
04:00 AM
|
Assembly
at Jollibee Farmers. Take jeep to Cogeo Gate II.
|
|
04:30 AM
|
ETA Cogeo Gate II. Take jeep bound to Sampaloc.
|
|
06:00 AM
|
Arrival
at Brgy. Cuyambay. Take
trike to barangay hall.
|
|
06:15 AM
|
Arrival at barangay
hall. Register. Secure guides.
|
|
06:30 AM
|
Take
trike to Maysawa jumpoff.
|
|
07:00 AM
|
Start trek.
|
|
08:30 AM
|
Arrival
at circuit junction. Take left trail to Mt. Sa Pari.
|
|
10:30 AM
|
Arrival at Mt. Sa Pari summit. Explore viewpoints.
|
|
11:00 AM
|
Start
descent. Take traverse trail to Mt. Binutasan.
|
|
12:00 PM
|
Arrival at kubohan. Lunch.
|
|
12:30 PM
|
Resume
trek.
|
|
02:00 PM
|
Arrival at Mt. Binutasan summit. Explore viewpoints.
|
|
02:30 PM
|
Start
descent to Maysawa Falls.
|
|
03:00 PM
|
Arrival at Maysawa Falls. Explore area.
|
|
03:30 PM
|
Start
trek back to jumpoff.
|
|
05:30 PM
|
Arrival at jumpoff. Tidy up.
|
|
06:00 PM
|
ETD
Brgy. Cuyambay
|
|
08:00 PM
|
ETA Manila
|
SPECIAL NOTES
Transportation: Going to Brgy. Cuyambay can be accessed through public transportation. One may opt to take the route described on the itinerary or ride a jeep to Tanay at Shaw, then take a jeep to Sampaloc, from jeeps going to Antipolo/Cogeo can be found.
For private transportation, take the Marcos highway. Stop at Pico de Pino Cafe and Restaurant. Take the downhill road on the right to go to the barangay hall. Parking is available at the Maysawa jumpoff at Php 25 per day.
Registration, porter and guide fees: Guide fees are fixed at Php 400 if you opt to go for a single hike, Php 700 for the entire circuit. The barangay hall implements a no guide, no hike policy. Registration and environmental fees costs Php 40.00.
Hiking and camping notes:
- Most parts of the trail are grassy and open. Wear proper attire.
- Cellular signals are not present across the entire trail.
- The whole trail is infested with limatik or leeches. Prepare accordingly.
- The trail can be really muddy and slippery especially during rainy season.
- There are two water sources along the trail - one on the circuit junction and the other one is on kubohan.
- Campsites are available at Mt. Binutasan.
Estimated budget: Php 600 - Php 800 (dayhike)
Overall rating of the mountain: 8/10. The mountain is relatively new and untouched.